Tabla de Contenidos
How to crimp hydraulic hoses — it is one of the most common questions on r/Hydraulics. The process is straightforward, but skipping steps causes leaks. Whether you use a hydraulic hose crimper or a manual unit, the same 7 steps apply. Here is the quick reference.
Paso 1: Corte limpio de la manguera
Cut the hose square using a hydraulic hose cutting machine or a chop wheel with a fine-tooth blade. A square cut means the fitting seats straight. For proper hose construction types, refer to the hydraulic hose reference.
Safety: Wire braid and spiral hose fray on contact. Wear cut-resistant gloves.
Paso 2: Seleccione la matriz correcta
Match the die to the hose size and fitting type. Each crimper die has a size stamp (e.g., P16/14 for 14 mm ID). Using the wrong die is the #1 cause of crimp failures — one Reddit user found their Amazon crimper’s dies didn’t match copper flare connectors and had to improvise with a smaller die, a gamble on pressure rating.
| ID de Manguera | Typical tamaño de matriz | Rango de Diámetro de Prensado |
|---|---|---|
| 1/4″ (6mm) | P10/06 or P16/06 | 6.0–8.0 mm |
| 1/2″ (12mm) | P16/12 or P18/12 | 12.0–14.0 mm |
| 1″ (25mm) | P18/23 or P20/23 | 23.0–27.0 mm |
| 2″ (50mm) | P32/51 | 51.0–57.0 mm |
Siempre verifique con la tabla de matrices del fabricante. Los tamaños de matriz no son universales entre marcas.
Paso 3: Pelar si es necesario
For interlock and some one-piece fittings, strip the rubber cover to expose the wire braid using a hose skiving machine. Skip this on skiveless fittings — but confirm which type you have before starting.
Paso 4: Insertar conexión y férula
Lubricate the fitting stem with assembly lube. Push the fitting into the hose until it bottoms out. Slide the ferrule over the hose end. The ferrule should sit flush — any gap means the fitting isn’t seated. For fitting thread standards (BSP, metric, SAE), check the ISO 8434 reference.
Safety: Do not lubricate with oil or grease if the hose carries hydraulic fluid. Contaminants degrade hydraulic fluid and seal compounds.
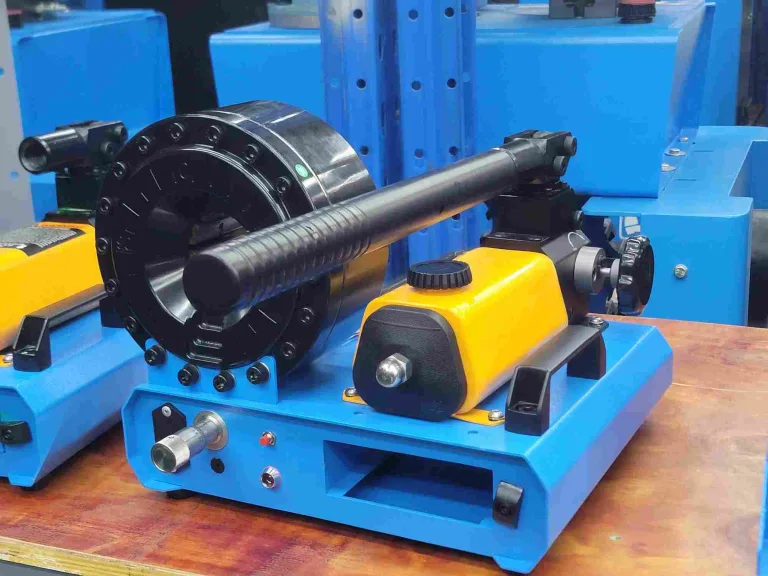
Paso 5: Configurar el diámetro de prensado
Look up the crimp diameter in the manufacturer’s spec chart. Set the die position on your prensa hidráulica to this diameter. On CNC machines, enter the value. On manual units, adjust the die holder.
Paso 6: Ejecutar el ciclo de prensado
Place the hose into the die set with the fitting stem facing up. Close the die cage and run the cycle. A manual hydraulic hose crimping tool takes about 10 seconds; electric machines complete in 6–8 seconds. The crimp creates a cold-weld bond between ferrule and fitting.
Safety: Keep hands clear of the die area during crimping. The radial force can exceed 100 tons on larger machines.
Paso 7: Medir y hacer prueba de presión
Measure the crimped diameter at three points with a vernier caliper. Compare to spec — TRCrimp machines hold ±0.03 mm tolerance, well under the industry average of ±0.125 mm. If off, adjust the die and start over with a new fitting. Do not re-crimp the same hose.
Pressure test at 2× working pressure following SAE J517 proof test requirements. A proper crimp holds without weeping, swelling, or fitting movement.
Errores comunes a evitar
| Mistake | Result | Fix |
|---|---|---|
| Tamaño de matriz equivocado | Prensado insuficiente — la conexión se desprende bajo presión | Siempre verifique la tabla de matrices antes de prensar |
| Extremo de manguera sucio | Contaminación en el sistema hidráulico | Limpie con paño sin pelusa y aire comprimido |
| Sin verificación con calibre | Prensados inconsistentes, fallos aleatorios | Mida cada conjunto — sin excepciones |
| Volver a prensar | La férula se agrieta o el alambre se daña | Corte y empiece de nuevo con una conexión nueva |
¿Necesita una prensadora de mangueras hidráulicas?
Desde unidades manuales de campo hasta máquinas CNC de taller — TRCrimp le cubre.